Build Your First Firearm
Lua animation API 1: New animation data lives in pack scripts under
config. JSON animation fragments below explain the data structure and legacy compatibility; do not duplicate them alongside Lua. See Lua animation machines and the parameter reference.
Build Your First Firearm
This is the shared configuration tutorial after any of the three authoring routes. Choose Your Workflow first if you have not built the assets. GLB paths below are examples: Blockbench users should substitute their geometry/animation JSON paths using format configuration. Behavior, materials, and events remain shared; Blender skinning-specific steps do not apply to pure rigid models.
This chapter is for a creator who has never made a GWO pack. Follow the checkpoints in order: first load a definition, then render a model, then verify shooting and reloading, and only then add arms, aiming, audio, attachments, and advanced states.
Do not continue when the current checkpoint fails. Adding more systems hides the original error.
Result and names used in this tutorial
You will build a semi-automatic training rifle with one ammunition type and a minimal current-format animation machine.
| Item | Tutorial value |
|---|---|
| Pack folder | my_first_gwo_pack |
| Namespace | tutorial |
| Firearm ID | training_rifle |
| Ammo ID | training_ammo |
| Ammo family | training_caliber |
| Animation rate | 30 FPS |
You may rename them, but every reference must change consistently.
Step 0: Prepare the environment
- Install Minecraft 1.21.1, the matching NeoForge version, and GWO.
- Prepare only the application for your selected route: Blender or Blockbench.
- Install an editor that saves valid UTF-8 JSON.
- Download and extract the empty content-pack template.
- If authoring arm motion, choose the matching arm template.
- Rename the pack folder to
my_first_gwo_packand place it in.minecraft/gwo/. - Rename
assets/example/toassets/tutorial/.
Checkpoint:
.minecraft/gwo/my_first_gwo_pack/pack.mcmeta
.minecraft/gwo/my_first_gwo_pack/assets/tutorial/
The game starts without content-pack JSON errors. An empty pack adds no item.
Step 1: Create the target paths
my_first_gwo_pack/
├─ weapons/firearms/training_rifle.json
├─ weapons/firearms/render/training_rifle.render.json
├─ bullets/training_ammo.json
└─ assets/tutorial/
   ├─ gltf/guns/training_rifle/training_rifle_receiver_default.glb
   ├─ gltf/animations/training_rifle_receiver_default.anim.glb
   ├─ skins/guns/training_rifle.png
   ├─ skins/guns/training_rifle_n.png
   ├─ skins/guns/training_rifle_s.png
   └─ textures/item/guns/training_rifle.png
Keep the first model as one complete receiver. Separate default barrel, magazine, and stock modules only after the base weapon works.
Rules:
- Use lowercase letters, digits, and underscores in paths.
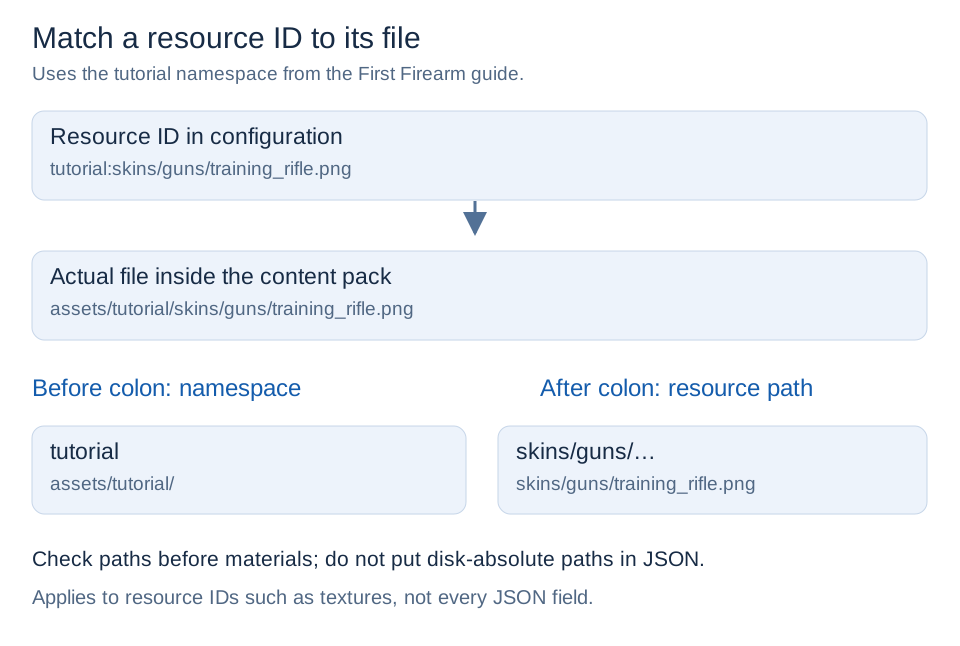
tutorial:gltf/...resolves toassets/tutorial/gltf/....- Keep
model_dataandicon_model_dataunique in your pack. - Replace accidental names such as
Action,idle.001, andCube.003.
Step 2: Build the first model
Complete the relevant Blender Armature, Blender Empty, or Blockbench modeling steps. Blockbench users do not need Blender, and Empty users do not need an Armature or Skin.
The shared first-person hierarchy is:
root
└─ tag_view
   ├─ tag_camera
   └─ tag_ads
      └─ tag_weapon
         └─ weapon_body
            ├─ weapon geometry and moving mechanisms
            ├─ tag_align_gun
            ├─ tag_weapon_focus (when needed)
            └─ tag_brass
A one-piece weapon places tag_flash on the moving weapon/barrel branch. Modular barrels may own it within their model. Do not parent moving anchors to the camera branch.
Export the GLB model at the planned path, retaining the hierarchy and Skin only where applicable. Bedrock users export geometry JSON and substitute its resource path in gltf_model, for example tutorial:models/training_rifle.geo.json.
Checkpoint: reopen the export in your application; check scale, muzzle direction, unique node names, hierarchy, transparent parts, and muzzle/ejection anchors. Change bind/initial transforms only with matching model and animation updates.
Step 3: Add textures and the item icon
Create:
assets/tutorial/skins/guns/training_rifle.png
assets/tutorial/skins/guns/training_rifle_n.png
assets/tutorial/skins/guns/training_rifle_s.png
assets/tutorial/textures/item/guns/training_rifle.png
The first file is base color/alpha, _n is the tangent-space normal map, and _s is GWO material/specular data. The item icon needs a transparent background. Give transparent meshes stable, separate names so they can later be listed under transparent_nodes.
Step 4: Export a minimal animation library
Start with idle, raise, drop, fire, reload, and reload_empty. Idle is the stable reference; draw ends there, holster leaves it, and fire/reload hand back without a jump.
Create Armature Actions for the skinning route, object-transform tracks grouped into exported clips for Empty, or group animations in Blockbench. Use 30 FPS as this example's event-frame reference, unique clip names, and only intentional tracks.
Export GLB animation to the planned .anim.glb or Bedrock animation to .animation.json. Reference it from animation_sources; reference full exported names in the controller’s clip. Names, hierarchy, and bind/initial reference must match the model.
Checkpoint: all six clips exist, frame zero works, draw ends at idle, fire has no unintended root offset, and GLB exports have no cross-skin ownership warnings.
Step 5: Define ammunition
Create bullets/training_ammo.json:
{
  "id": "tutorial:training_ammo",
  "display_name": "Training Ammunition",
  "family": "tutorial:training_caliber",
  "icon_model_data": 30001,
  "ballistics": {
    "max_entity_hits": 1
  },
  "tracer": {
    "count_interval": 0,
    "color": "#FFFFEBA0",
    "size_multiplier": 1.0,
    "length_multiplier": 1.0
  }
}
This first pass intentionally omits cartridge and casing models. Add them after logic works, using Firearms, Ammunition, and Materials.
Run:
/gwo reload
/gwo give ammo "tutorial:training_ammo"
Checkpoint: the ammo definition loads without an error and the command gives the item.
Step 6: Define firearm gameplay
Create weapons/firearms/training_rifle.json:
{
  "id": "tutorial:training_rifle",
  "display_name": "Training Rifle",
  "creative_category": "assault_rifle",
  "creative_sort": 100,
  "model_data": 30000,
  "magazine_size": 30,
  "ammo": {
    "default": "tutorial:training_ammo",
    "accepted_families": ["tutorial:training_caliber"]
  },
  "damage": 8.0,
  "range": 96.0,
  "ballistics": {
    "muzzle_velocity": 500.0,
    "gravity": 9.8,
    "drag": 0.015,
    "water_drag": 0.6,
    "life_seconds": 2.5,
    "hitbox_inflation": 0.12,
    "headshot_multiplier": 1.5,
    "headshot_height_fraction": 0.25,
    "damage_curve": [
      {"distance": 0, "multiplier": 1.0},
      {"distance": 32, "multiplier": 1.0},
      {"distance": 64, "multiplier": 0.85},
      {"distance": 96, "multiplier": 0.65}
    ]
  },
  "inaccuracy": {
    "stand": 5.0,
    "move": 5.5,
    "sneak": 2.75,
    "lie": 1.5,
    "aim": 0.1
  },
  "mechanics": {
    "rpm": 600,
    "fire_interval_ms": 100,
    "action_commit_ms": {
      "reload": 1300,
      "reload_empty": 1800
    }
  },
  "fire_modes": ["semi"],
  "render": "weapons/firearms/render/training_rifle.render.json"
}
60000 / rpm must approximately equal fire_interval_ms. accepted_families matches the ammunition family, not its filename. Reload commits change gameplay ammo; animation and sound frames do not.
Step 7: Add rendering and Animation Machine v2
Create weapons/firearms/render/training_rifle.render.json and copy the complete minimal configuration below:
{
  "gltf_model": "tutorial:gltf/guns/training_rifle/training_rifle_receiver_default.glb",
  "animation_sources": [
    "tutorial:gltf/animations/training_rifle_receiver_default.anim.glb"
  ],
  "texture": "tutorial:skins/guns/training_rifle.png",
  "normal": "tutorial:skins/guns/training_rifle_n.png",
  "specular": "tutorial:skins/guns/training_rifle_s.png",
  "icon_texture": "tutorial:textures/item/guns/training_rifle.png",
  "animation_events": {
    "raise": "raise",
    "drop": "drop",
    "fire": "fire",
    "reload": "reload",
    "reload_empty": "reload_empty"
  },
  "animation_machine": {
    "version": 2,
    "actions": {
      "raise": {
        "type": "finite",
        "default_state": "raise"
      },
      "drop": {
        "type": "finite",
        "default_state": "drop"
      },
      "fire": {
        "type": "finite",
        "default_state": "fire",
        "events": [
          {
            "type": "shot_effects",
            "marker": "shot",
            "offset_ms": 0
          },
          {
            "type": "fire_sound",
            "marker": "shot",
            "offset_ms": 0
          },
          {
            "type": "recoil",
            "marker": "shot",
            "offset_ms": 0
          }
        ]
      },
      "reload": {
        "type": "finite",
        "default_state": "reload",
        "variants": [
          {
            "state": "reload_empty",
            "priority": 100,
            "when": {
              "empty": "true"
            }
          },
          {
            "state": "reload",
            "priority": 0
          }
        ]
      }
    },
    "interrupts": []
  },
  "animation_controller": {
    "channels": {
      "raise": {
        "clip": "raise",
        "layer": "action",
        "loop": false,
        "duration_frame": 24
      },
      "drop": {
        "clip": "drop",
        "layer": "action",
        "loop": false,
        "duration_frame": 21
      },
      "fire": {
        "clip": "fire",
        "layer": "recoil",
        "loop": false,
        "duration_frame": 8
      },
      "reload": {
        "clip": "reload",
        "layer": "action",
        "loop": false,
        "duration_frame": 76,
        "lock_fire": true
      },
      "reload_empty": {
        "clip": "reload_empty",
        "layer": "action",
        "loop": false,
        "duration_frame": 81,
        "lock_fire": true
      },
      "idle": {
        "clip": "idle",
        "layer": "base",
        "loop": true
      }
    }
  },
  "gltf_scale": 0.075,
  "first_person": {
    "anchor_node": "tag_camera",
    "camera_node": "tag_view",
    "use_camera_transform": true,
    "translation": {
      "x": 0,
      "y": 0,
      "z": 0
    },
    "rotation": {
      "x": 0,
      "y": 0,
      "z": 0
    },
    "scale": 1
  },
  "camera": {
    "model_fov": 50
  },
  "shell_effect": {
    "anchor_bone": "tag_brass"
  }
}
Replace every duration_frame with the real clip length. Do not use display translation to repair a backwards model, and do not use global scale to repair one attachment.
Step 8: First in-game acceptance pass
Restart the game for the first complex GLB load, then run:
/gwo reload
/gwo give firearm "tutorial:training_rifle"
/gwo give ammo "tutorial:training_ammo"
Verify in order:
- The weapon appears in inventory.
- Equip plays
raise. - Idle does not drift.
- Fire consumes ammunition and plays
fire. - Tactical reload commits at
action_commit_ms.reload. - Empty reload selects
reload_empty. - Holstering plays
drop. - Muzzle effects originate at
tag_flash. - Logs contain no missing clip, missing node, cross-skin, or JSON error.
Common diagnosis:
| Symptom | Check first |
|---|---|
| No creative item | definition path, id, render, reload log |
| Purple/black item | missing texture or item icon |
| Reversed weapon | Blender +X muzzle direction |
| Wrong size | model units, applied mesh scale, gltf_scale |
| No animation | source path, clip name, clip map, state reference |
| Reload animates but ammo does not change | mechanics.action_commit_ms |
| Wrong muzzle/casing origin | tag_flash / tag_brass transform |
| Changes appear ignored | duplicate IDs, folder plus ZIP, cache requiring restart |
Step 9: Use shared first-person arms
Read how authoring arms differ from runtime geometry. Animate arms with the weapon; runtime uses shared geometry and the player's skin. A second animation set is not required.
Add this to the render definition for the existing Armature arm workflow:
"first_person_arms": true,
"arms": {
  "enabled": true,
  "left_holder_bone": "LEFT_ARM",
  "right_holder_bone": "RIGHT_ARM",
  "poses": {
    "raise": {"blend_ticks": 5},
    "drop": {"blend_ticks": 5},
    "fire": {"blend_ticks": 2},
    "reload": {"blend_ticks": 6},
    "reload_empty": {"blend_ticks": 6}
  }
}
Omitting arms.model uses gwo:gltf/arms/arms.glb. Do not duplicate the mesh in every pack or weapon. Keep required arm reference nodes and tracks in the weapon animation. Holder names must exist; blend_ticks adjusts handoff rather than fixing missing tracks.
A custom arms.model is an advanced replacement. For Empty or Bedrock arms, check the release requirements, export the matching runtime assets, and follow Arm Templates. Existing default-arm configurations do not need to change.
Checkpoint: correct player skin and regular/slim/layer selection, stable grip through idle/fire/reload, no handoff jump, and no duplicate preview arm geometry.
Step 10: Add aiming
Add ads_up, ads_down, and fire_ads, then configure clip maps, event categories, paired_aim_actions.fire, the aim machine enter/loop/exit phases, controller channels, tag_ads ownership, and last-frame handling. Follow Animation Rules.
Checkpoint: iron sights align at screen center, ADS exits without a flash to an intermediate pose, and firing remains in the intended ADS pose. Do not move a reticle texture to hide wrong model alignment.
Step 11: Add audio
Put OGG Vorbis under assets/tutorial/sounds/training_rifle/, register it in sounds.json, use gameplay sound_events for firing and render animation_commands for timed mechanical sounds.
{
  "training_rifle_fire": {"sounds": ["tutorial:training_rifle/fire"]},
  "training_rifle_mag_in": {"sounds": ["tutorial:training_rifle/mag_in"]}
}
Gameplay fragment:
"sound_events": {"fire": "tutorial:training_rifle_fire"}Render fragment:
"animation_commands": {
  "reload": [
    {"frame": 39, "type": "sound", "sound": "tutorial:training_rifle_mag_in"}
  ]
}
Checkpoint: the fire sound happens once, mechanical events match the visible frame, and empty/normal reload event maps are correct.
Step 12: Split default modules
Separate only one part per test cycle. Each needs a behavior JSON, render JSON, slot, default_installed: true, a real anchor_node, a weapon modules entry, and matching reference space and material paths. See Attachments.
Checkpoint: the part installs by default, appears in the appropriate modification slot, follows its animated anchor, and does not change the whole gun's scale or orientation.
Step 13: Complete weapon features
Add only needed features: first draw; last-round/dry-fire and empty-state poses; inspection; sprint/super-sprint; fire-mode changes; weapon melee; ammo/follower poses; muzzle effects/smoke/tracers/casings; sway/recoil; third-person/stowed/frame/preview transforms; optional attachments.
| Type | Rule |
|---|---|
xmaglrg | Separate *_xmaglrg states and commits |
drummag | Independent *_drummag states; not xmaglrg |
| Tube shotgun | reload_system.type: tube_per_round; event frames only |
| Bolt-action | fire_rechamber / fire_rechamber_ads and cycle recovery |
| Standalone melee | weapons/melee/ and its own combo machine |
Step 14: Final release checkpoint
For optional custom arms, configure arms.model using the arm-template guide. Empty / Bedrock independent-arm child support requires a version with the corresponding arm support; the default arms and existing pack configuration do not need changes.
Complete Debugging, Acceptance, and Release, then verify a clean game restart—not only hot reload. Do not ship duplicate packs, absolute local paths, source .blend files, diagnostics, caches, backups, or obsolete compatibility data. A release ZIP must expose pack.mcmeta, weapons, attachments, bullets, and assets at its root.
Recommended reading order: